Fiche 4.2 : Un photomètre à absorption pour l'enseignement à l'école (2/6)
Ni cette fiche, ni les pages suivantes ne remplacent le manuel d'instructions disponible auprès du fabricant du photomètre. Cette feuille de travail présente certaines opérations qui peuvent être discutées et réalisées expérimentalement à l'aide de la section sur l'absorption.
Lors de la mise en place de l'alignement et pendant la mesure, les guides de lumière ne doivent pas être fortement pliés, sinon la fibre de verre se brisera. Le rayon de courbure ne doit pas être inférieur à 15 cm.
Fonctions de base
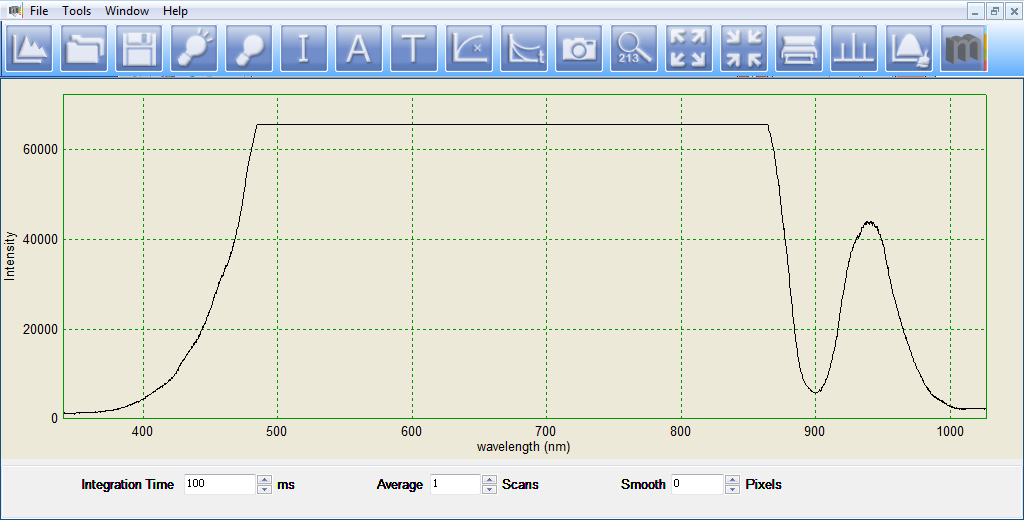
Après l'installation du logiciel d'accompagnement sur l'ordinateur, les composants doivent être câblés comme indiqué sur l'image du site précédent. La source lumineuse, qui est intégrée dans le porte-cuvette, est allumée. Dans un premier temps, aucune cuvette n'est utilisée. Lorsque le programme est lancé, le spectromètre enregistre en continu les spectres des faisceaux lumineux entrants, qui sont indiqués dans la fenêtre de données.

Le spectre est présenté sous forme d'intensité en unités arbitraires sur la longueur d'onde en nanomètres. La courbe constante entre environ 480 et 860 nm ne ressemble pas à un véritable spectre. C'est là que la plage de rejet maximale de la matrice de détecteurs a été dépassée, de sorte que le spectre est surchargé.
La première tâche consiste à mettre le réseau de détecteurs dans un mode de fonctionnement dans lequel les intensités ne sont pas trop élevées à n'importe quel point du spectre. Les valeurs d'intensité dépendent de la luminosité, notamment de la durée pendant laquelle la lumière entrante est additionnée ou intégrée. Ce temps d'intégration peut être ajusté dans le champ de saisie situé en bas de la fenêtre de données. Si, par exemple, il est réduit de 100 ms à 15 ms, le signal n'atteint que 15 % des valeurs d'origine.
![]() En outre, la plage de valeurs des intensités et des longueurs d'onde indiquées dans les graphiques peut
être modifiée. Nous supposons que nous ne sommes pas intéressés par les signaux supérieurs à 750 nm,
alors que l'échelle d'intensité ne doit pas être modifiée. Ceci peut être réalisé dans une fenêtre en
cliquant sur le symbole ci-contre. Le résultat est illustré dans l'image suivante.
En outre, la plage de valeurs des intensités et des longueurs d'onde indiquées dans les graphiques peut
être modifiée. Nous supposons que nous ne sommes pas intéressés par les signaux supérieurs à 750 nm,
alors que l'échelle d'intensité ne doit pas être modifiée. Ceci peut être réalisé dans une fenêtre en
cliquant sur le symbole ci-contre. Le résultat est illustré dans l'image suivante.

