Make Your Own Anaglyph!
If you have read the principles of an anaglyph, it is time to get going yourself!
Objectives
- You will reproduce the principles of an anaglyph.
- You will make your own anaglyph.
Materials
- Digital camera
- Computer
- Computer programme called Anamaker* which you can download here.
* The programme Anaglyph Maker ‘Anamaker’ is made by Takashi Sekitani. http://www.stereoeye.jp/software/index_e.html
Procedure
1) Creation of the images:
To create an anaglyph, you need two images: one image for the left eye, and one for the right eye.
With your camera, take two images from the same scene, each from a different angle. Keep the focus line
parallel to the original.
TIP: Try to make a stereopair of a scene with some features nearby as well as in the distance. This will provide
more contrast in your 3D image.
Questions:
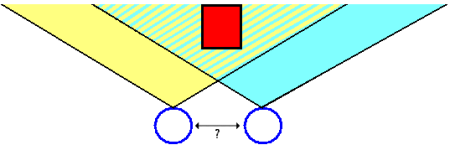
- How much should be the distance between the two positions of your camera?
- Find out what will go wrong with the construction of a stereopair in the following situation:
It is a sunny but very windy day when your teacher gives your class the task to make an anaglyph. You take your camera with you and try to find a nice scenery where you can take your pictures. Outside the city there's a fabulous castle with a pond in front of it where some ducks are swimming around. The branches of a willow next to the pond are moving in the wind. ‘This is the perfect place to make two nice images’ you think. You take one image, move your camera a little bit, and take another. At home you find out that your stereopair failed in different places. ‘What went wrong?’ you wonder.
- Can you think of a solution for this problem?
2) Making the anaglyph
Once the images are taken, you have to insert them into a GIS to make the anaglyph. Of course there are many GIS programmes, each one more complicated than the other. The program used in this exercise is a simplification of what a normal GIS program does.
- Save your two images on your computer (Tip: name them correctly! For example: image_left, image_right).
- Open the ‘Anaglyph Maker’.
- Load the left image and the right image. In the left column you have to select the anaglyph type depending on the glasses you will use (for example, if you use red-green glasses, click on ‘Anaglyph Red-Green’).
- Press the ‘Make 3D image’ button. In the main square, your anaglyph should appear.
- View anaglyph with the coloured glasses (red filter on the left).
Things that can go wrong:
Of course, there is a possibility that your camera was not 100 percent stable when you took the pictures.
You may correct this by adjusting the position of one image on the screen with regard to the other by using
the arrows (L = left, R = right, U = up, D = down).
Tip: try to position the images so that a feature on one image lies exactly on the same feature on the other
image. This will ease viewing it in 3D.
Questions:
- Can you reproduce what happened when you pushed the ‘Make 3D image’ button?
- You have seen the image in 3D with the red filter on you left eye. Do you know which image got which colour?
- What will happen when the distance between the two images is more than 6,5 cm?
